
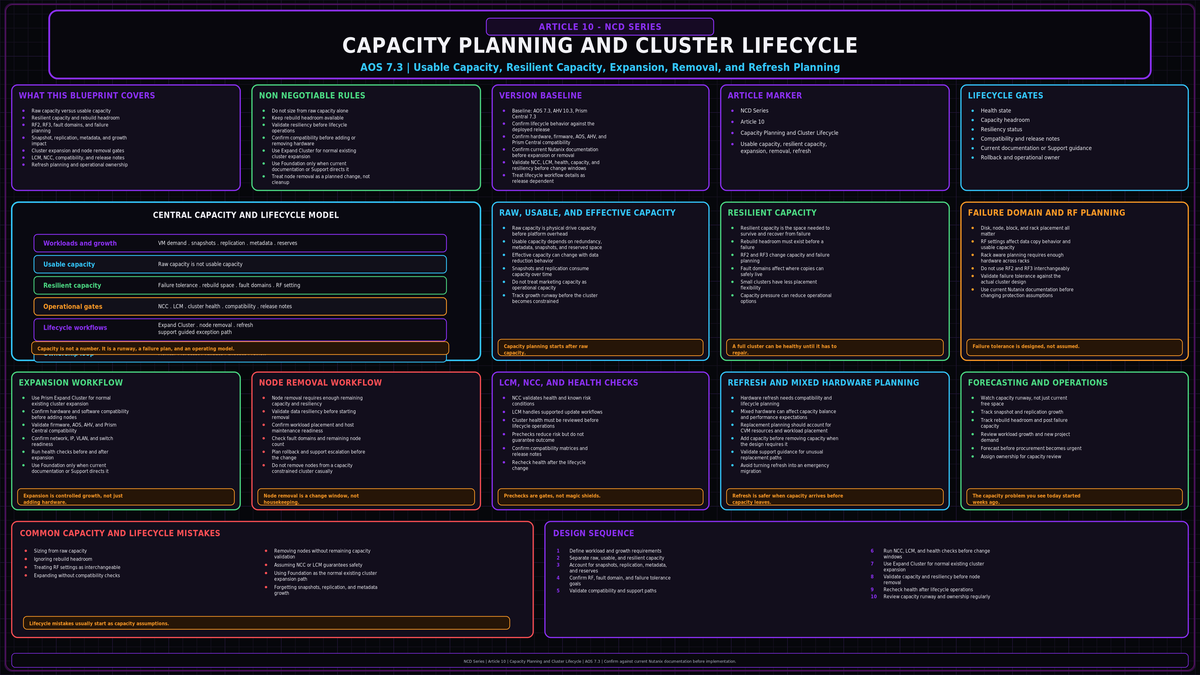
NCD-10 in the Nutanix Cluster Design series. This article covers capacity planning and the cluster lifecycle on AOS 7.3 with AHV 10.3 and Prism Central 7.3: how to read usable against resilient capacity, how the Planning dashboard forecasts runway, and how to expand, shrink, and refresh a cluster without dropping below the line where it can still rebuild after a failure. Update mechanics for AOS, AHV, and firmware live in NCD-06 and are out of scope here.
Sources: portal.nutanix.com (Prism Central Infrastructure Guide, Web Console expand and remove procedures, capacity and resiliency documentation), nutanixbible.com (Steven Poitras, cluster expansion and ADSF behavior), next.nutanix.com (staff and Nutanix Technology Champion attributed answers on node removal floors), timeline.ntnx.to and endoflife.date/nutanix-aos (AOS 7.3 release and maintenance dates). Confirm version specific behavior against current Nutanix documentation before implementation.
Usable capacity is not the number that matters
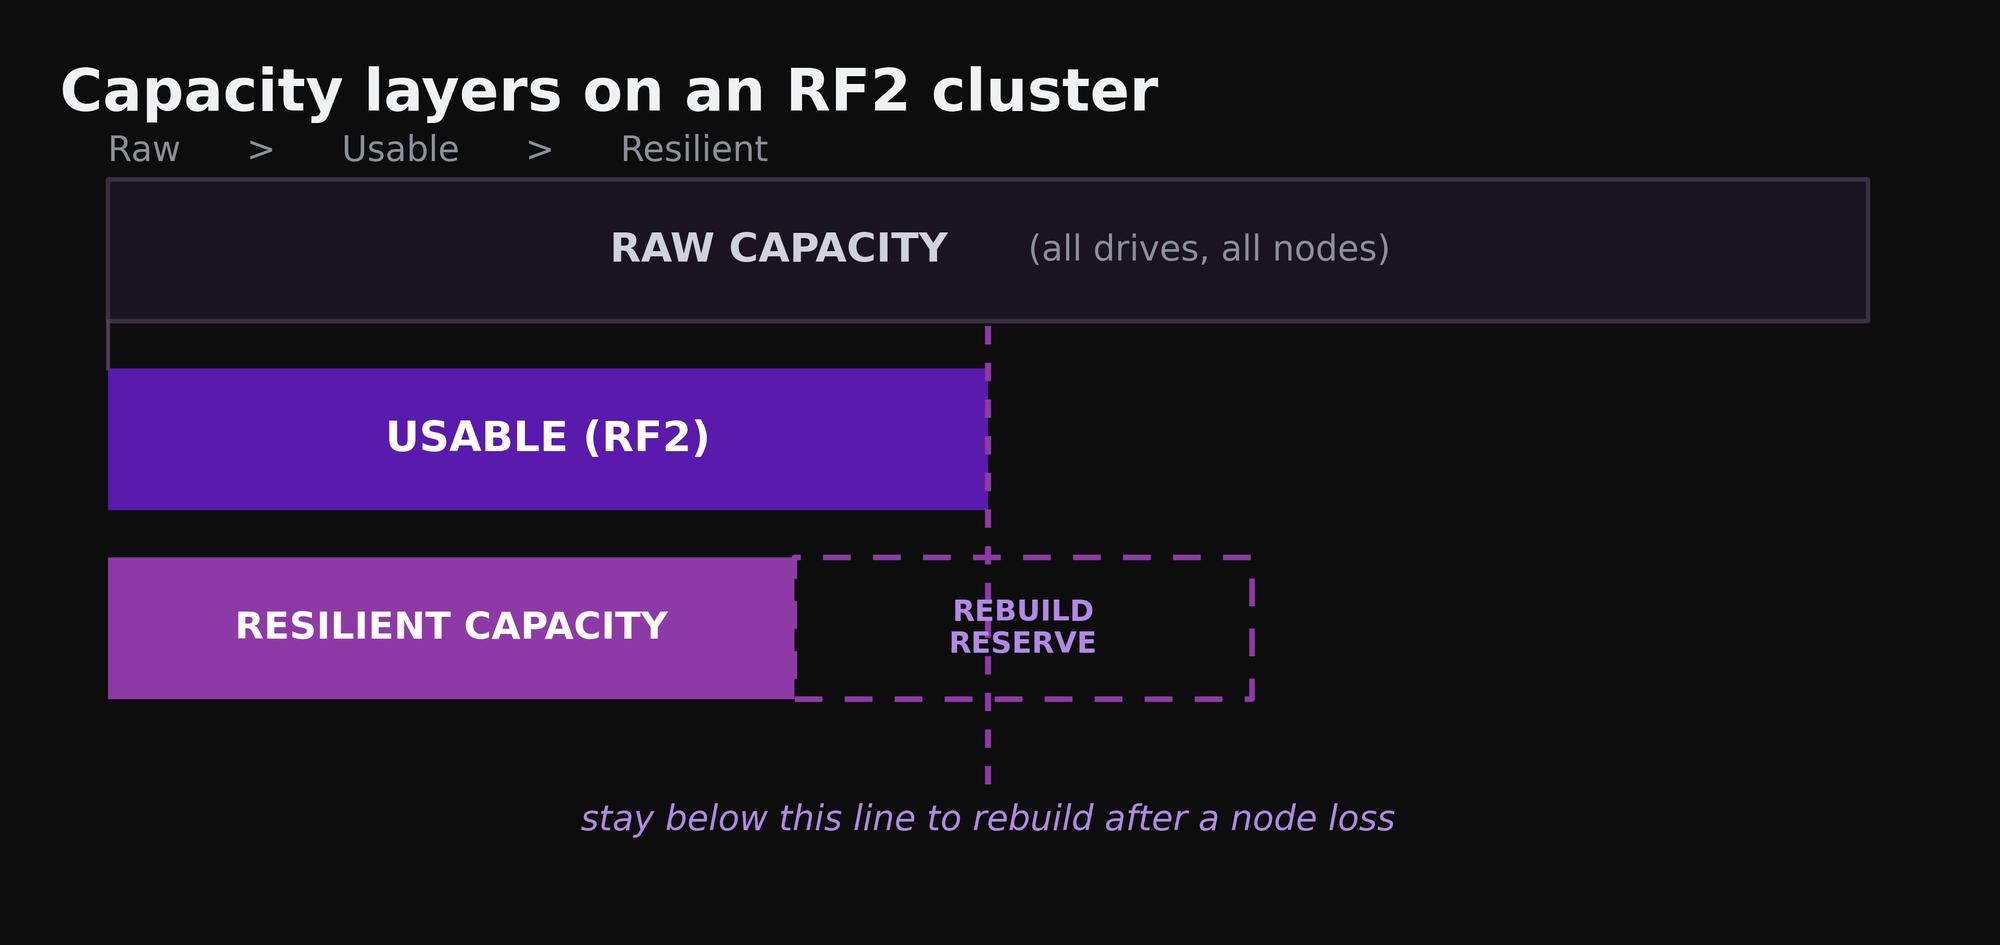
The capacity figure on a sizing quote is usable capacity: raw drive capacity after the redundancy factor overhead. On an RF2 cluster that is roughly half of raw before any savings from EC-X, deduplication, or compression. RF3 takes a larger share. That number tells you how much data the cluster can hold. It does not tell you how much data the cluster can hold and still survive a node loss.
The number that governs design is resilient capacity: the amount of stored data below which the cluster can lose a node, or a disk, and rebuild every affected extent back to its configured redundancy factor using the capacity left on the surviving nodes. Cross that line and a failure still keeps your data online from the second copy, but the cluster cannot restore full redundancy until you free space or add a node. You are running exposed until then.
The gap between usable and resilient is the rebuild reserve. For FT1 it is approximately one node worth of space held in reserve so the Acropolis Distributed Storage Fabric can rebuild the lost copies. Curator drives that rebuild and keeps drive utilization balanced across the cluster. Design so that steady state usage sits below resilient capacity with room for growth on top, not so that it sits just under usable.
The exact resilient capacity threshold Prism reports varies with node count, drive layout, and fault tolerance level. Confirm the current percentage behavior against the Prism Central capacity documentation on portal.nutanix.com for the AOS 7.3 and Prism Central 7.3 release before sizing to a fixed figure.
Reading capacity in the Planning dashboard
Prism Central surfaces capacity forecasting under the Planning dashboard. Two views matter for lifecycle decisions.
Capacity Runway
Runway is the number of days remaining before a resource is consumed, calculated per registered cluster across storage, CPU, and memory. The forecast is machine learning driven and seeds from roughly 90 days of historical data from each Prism Element, then refines as more data accrues. The storage runway accounts for live usage, system usage, reserved capacity, and snapshot capacity, so a cluster generating heavy local snapshots will show a shorter runway than raw consumption alone suggests. The shortest of the three resource runways is the one that forces a buying decision.
What If scenarios
The Scenarios view lets you model demand before it arrives. Add a hypothetical workload, for example 150 VDI seats or a block of SQL servers, and the forecast recalculates the runway with that load applied. Set a target window, say 180 days, and the Recommend action proposes a node configuration sized to hold the runway above that target. This is where expansion gets planned: you size the buy against the forecast, not against the day the cluster fills.
Capacity Runway and What If scenario modeling are Nutanix Cloud Manager features, formerly delivered under Prism Pro, surfaced inside Prism Central. They are not part of base Prism or Starter licensing. If predictive capacity planning is a design requirement, budget for the NCM tier that includes it. Confirm the exact tier and feature mapping for the current NCM release on portal.nutanix.com.
A companion NCM capability flags inefficiency: VMs provisioned with more CPU and memory than they actually use. Reclaiming that headroom is often cheaper than buying nodes, and it belongs in any capacity review before an expansion is approved.
Sizing the cluster up front
Greenfield sizing has to fold in every overhead before it lands on a node count. The redundancy factor sets the base multiplier. The rebuild reserve carves out the FT headroom. Snapshots and replication consume the same pool as primary data, both local restore points and any inbound replicas from other clusters. The CVM and AOS itself reserve compute and memory on every node. Size to the design target below resilient capacity, with growth headroom on top, not to the usable figure.
Heterogeneous node counts are supported. A cluster can mix models and generations, and the fabric handles uneven node capability. The design caution is skew: a storage heavy node added to a compute heavy cluster, or the reverse, pulls data placement and scheduling toward the larger resource and can leave the smaller one as the constraint. Plan node profiles so the cluster scales evenly on the resource that actually runs short first.
Expanding a cluster
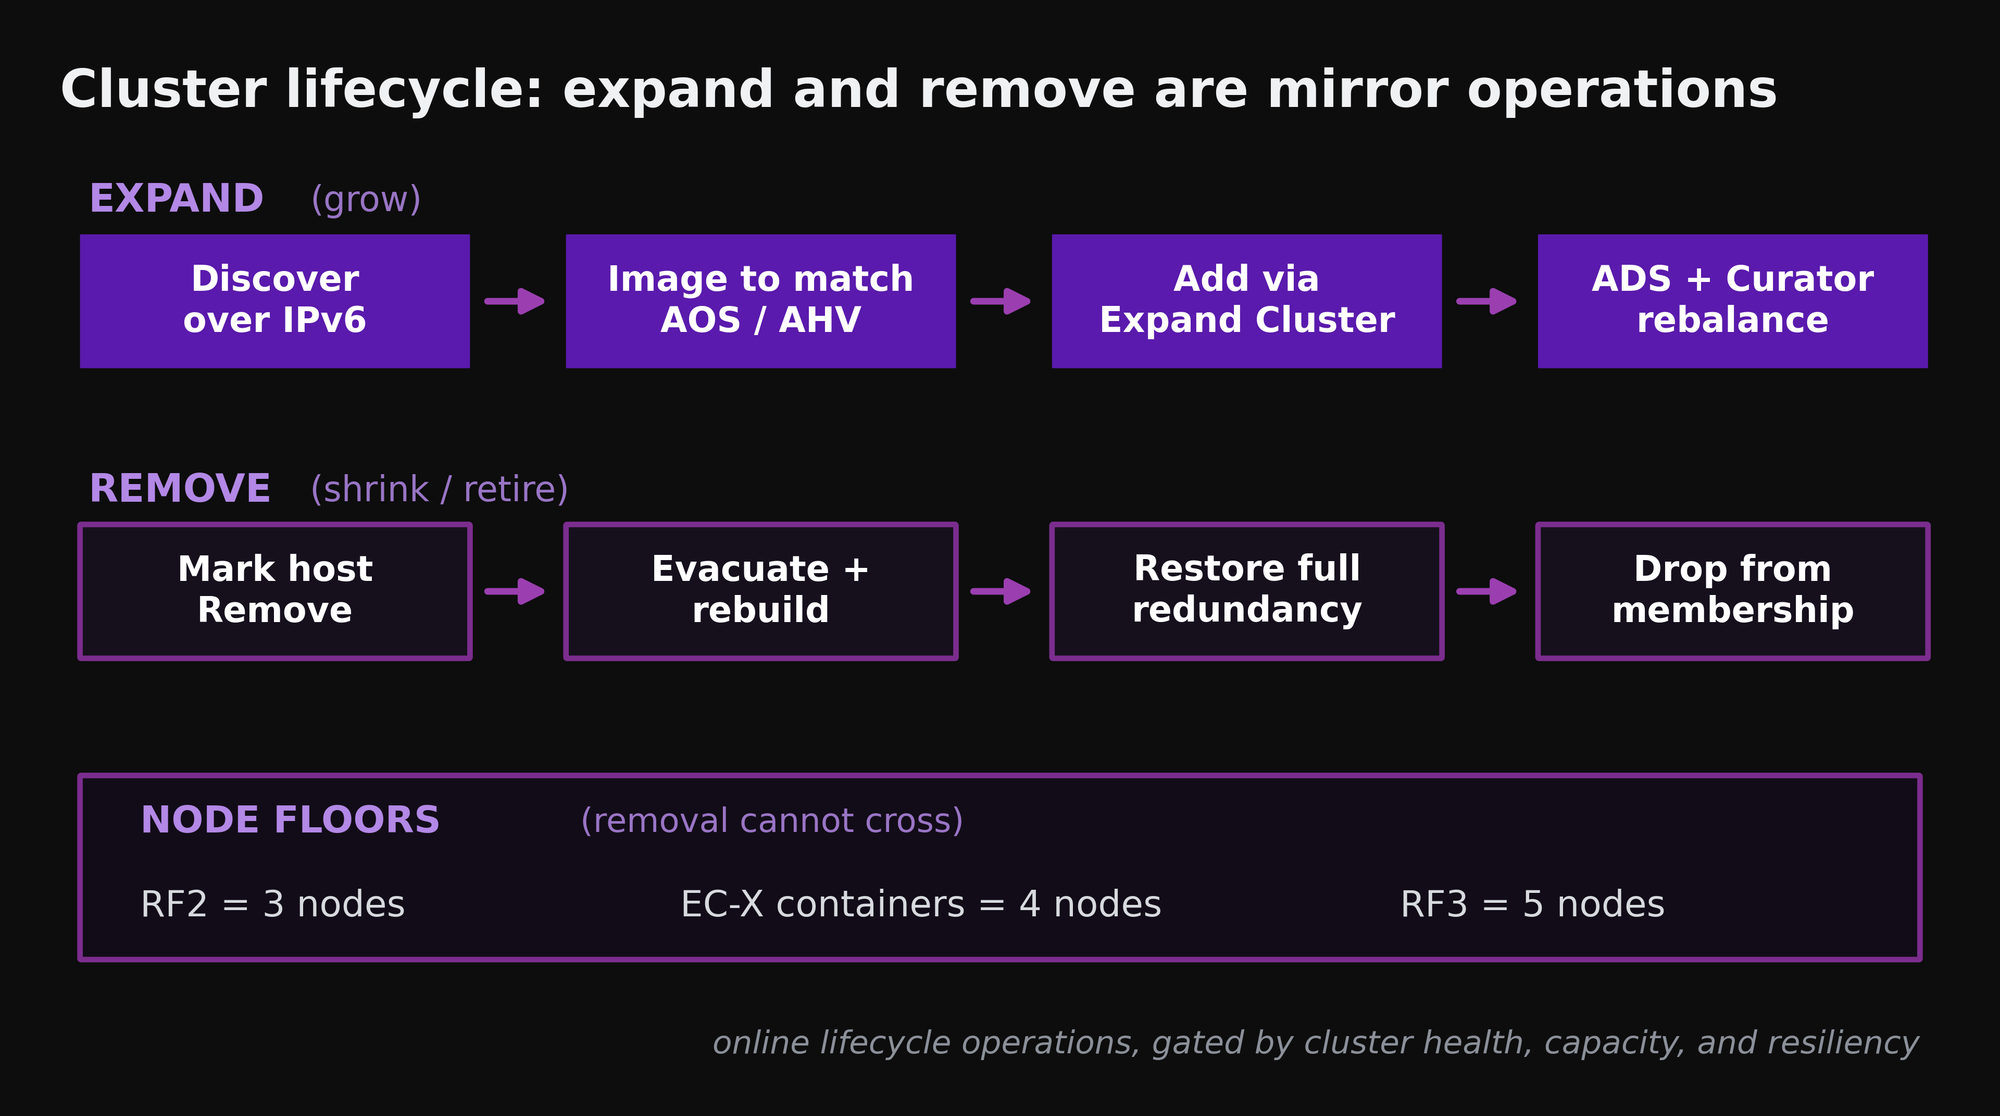
Adding nodes to a running cluster goes through the Expand Cluster workflow in Prism Element. Foundation builds new clusters; Expand Cluster grows existing ones. Use the Expand Cluster workflow for normal node expansion, and use Foundation only when the documented workflow or Nutanix Support guidance calls for it, such as manually imaging a node that will not discover. The running cluster discovers a new node over IPv6 multicast once it is racked, cabled to switch ports configured the same as the existing nodes, and powered on. Multiple nodes can be discovered and added in one operation.
- 1Rack, cable, and power the new node. Match the switch port configuration, including VLAN tagging and any uplink bonding, to the existing nodes.
- 2Confirm the cluster is healthy and fully resilient before starting. Expansion of a degraded cluster is asking for trouble.
- 3Open Expand Cluster in Prism Element. The discovered node appears. Run the Plan Resources step to review the proposed configuration.
- 4Assign the host, CVM, and IPMI addresses for the new node. Confirm they do not overlap anything in use.
- 5The node is reimaged during the expand to match the cluster AOS and AHV versions. For AHV, no image upload is needed when the version already exists in the Foundation installer store; otherwise upload it.
- 6The add completes and the cluster reports the new size and resources.
- 7Acropolis Dynamic Scheduling migrates VMs onto the new node, and Curator rebalances data across the larger pool. Both run automatically; you can migrate a few VMs by hand if you do not want to wait.
- 8Update the virtual switch so the new node uses the correct uplinks, then confirm any additional virtual switches match the rest of the cluster.
Expansion is designed to run online, but it still depends on cluster health, free capacity, resiliency state, and version compatibility, so confirm those before you start. If discovery does not work, usually because IPv6 multicast is blocked on the switch or LACP is configured on the ports, use Foundation only as the documented fallback: image the node manually to the exact cluster versions, leave automatic cluster creation unselected, then add it by entering its CVM address in Expand Cluster.
The hypervisor image upload field appears in Prism Element. If you are driving expansion from Prism Central, stage the image through Prism Element first. Confirm the current Prism Central expand workflow against portal documentation for Prism Central 7.3, since the upload behavior has shifted across releases.
Removing and decommissioning nodes
Node removal is the same operation whether you are retiring aging hardware, pulling nodes to seed another cluster, or shrinking a cluster that was overbuilt. The fabric is designed to add and remove nodes as controlled lifecycle operations, but the outcome still depends on cluster health, remaining capacity, and resiliency state, so treat the pre checks as the real work. Treat node removal as a planned change with rollback thinking, not a casual cleanup step.
Before removing a node, confirm three things. The cluster is healthy and green. The surviving nodes have enough free capacity to absorb the departing node data without pushing any drive past safe utilization, which means keeping disks under 95 percent and leaving real headroom. The remaining node count still honors the redundancy factor with N+1 in hand, so a failure during or after the removal does not break resiliency.
The removal itself is initiated from the Hardware dashboard in Prism Element by selecting the host and choosing Remove Host, or through the equivalent ncli host command. The node enters maintenance mode and AOS evacuates its data, replicating every affected extent again to the remaining nodes until the cluster is back to full redundancy, then drops the node from membership. There is no manual data move. Remove one node at a time, and expect the operation to take from minutes to hours depending on how much data lives on the node and how much rebuild bandwidth the cluster has.
The floors you cannot cross
Removal is blocked if it would take the cluster below the minimum node count for its configuration. These floors are hard.
| Configuration | Minimum nodes | Why |
|---|---|---|
| RF2 (FT1) | 3 | Three is the floor for the quorum services and for holding two data copies on separate nodes with a place to rebuild. |
| RF3 (FT2) | 5 | Three data copies plus the ability to rebuild after a second failure needs five nodes. |
| EC-X enabled containers | 4 | Erasure coding strips need at least four nodes to lay out data and parity across separate fault domains. |
A three node RF2 cluster cannot shed a node. If you need to refresh hardware on a cluster sitting at its floor, you add the replacement node first, then remove the old one, never the reverse.
Hardware refresh and the AOS 7.3 lifecycle
Hardware refresh on a Nutanix cluster is a rolling operation, not a forklift. Add the new generation nodes, let the fabric rebalance, then remove the old nodes one at a time. Done on a healthy cluster with capacity and resiliency confirmed at each step, the refresh runs online, which is the design advantage over controller based storage where a refresh drops redundancy while a controller is offline. Mixed generations coexist during the transition; the caution is not to leave a cluster straddling two generations long term, because the slower or smaller nodes bound placement and rebuild speed.
Licensing is term based under the NCI and NCM model and is portable, so the entitlement moves with a refresh rather than being stranded on retired hardware. Confirm core counts on the incoming nodes against the license, since the count is what is consumed.
AOS 7.3 released on 24 June 2025 with a maintenance window that ends in 2027. Validate the exact end of maintenance date against endoflife.date/nutanix-aos and timeline.ntnx.to, and treat that date as the planning boundary for the AOS upgrade path covered in NCD-06.
Tie the refresh to the lifecycle calendar. A cluster running AOS 7.3 needs an upgrade path defined before maintenance ends, and a hardware refresh window is the natural point to land the cluster on a supported release rather than upgrading aging nodes you are about to retire.
The capacity and lifecycle mistakes that cost you later
Sizing to usable instead of resilient capacity
The most common and most expensive error. A cluster sized to usable capacity has no rebuild reserve. The first node failure leaves it unable to restore redundancy, and you are buying nodes under pressure during an incident instead of on a plan.
Forgetting that snapshots and replication share the pool
Local restore points and inbound replicas consume the same capacity as primary data. A runway that looks healthy on primary data alone collapses once snapshot retention and replication schedules are counted. The Planning dashboard storage runway already folds these in, which is a reason to trust it over a manual spreadsheet.
Assuming the planning tools come for free
Capacity Runway and What If scenarios depend on NCM licensing. A design that leans on predictive capacity planning without the license tier to back it is a design with a hole in it. Decide the tier during sizing, not after.
Removing a node that drops you to the floor
Pulling a node from a cluster sitting near its minimum count leaves no N+1 and can stall the removal itself if there is nowhere to rebuild. Add before you remove when the cluster is at or near 3, 4, or 5 nodes.
Treating heterogeneous expansion as free
Adding a node that is heavy on one resource and light on another skews placement toward the larger resource and can make the smaller one the cluster constraint. Match node profiles to how the cluster actually grows.
Deferring the AOS upgrade until maintenance ends
The 7.3 maintenance boundary is a planning date, not a surprise. Define the upgrade path well ahead of it, and use a hardware refresh window to land on a supported release in one motion.
- Design to resilient capacity, the point below which the cluster can lose a node and rebuild to full redundancy, not to the usable figure on the sizing quote.
- The rebuild reserve is roughly one node worth of space for FT1. Keep steady state usage below resilient capacity with growth headroom on top.
- Prism Central Planning gives you Capacity Runway in days per resource and What If scenarios to size expansion against forecast demand. Both are NCM features, not base licensing.
- Storage runway already counts live usage, system usage, reserved capacity, and snapshots, so trust it over manual primary data math.
- Expand through the Expand Cluster workflow in Prism Element. New nodes are discovered over IPv6 and reimaged to match the cluster. Expansion is designed to run online, but confirm health, capacity, and resiliency first. ADS and Curator rebalance automatically.
- Remove through the Hardware dashboard. AOS evacuates and rebuilds the data with no manual move. Remove one node at a time.
- Node floors are hard: 3 for RF2, 5 for RF3, 4 for EC-X containers. Refresh by adding the new node before removing the old one.
- Hardware refresh is rolling and online. AOS 7.3 maintenance ends in 2027; define the upgrade path before then and land it during a refresh window.