Your Honeypot Just Fired. Now What?

Your Honeypot Just Fired. Now What?
The previous article in this series covered what a honeypot is, why backup infrastructure specifically needs one, and how to enable the Ootbi feature in five steps. This article is about what comes next.
Getting an alert is not the same as knowing what to do with it. Most backup admins have spent a lot of time thinking about how to recover from an attack. Far fewer have a documented plan for what to do in the minutes and hours after they detect that something is actively probing their environment. This is that plan.
It is written for backup administrators - not security analysts, not CISOs. The focus is on the actions that are specifically yours to take, when to take them, and how to use the tools already in your Veeam environment to protect your ability to recover.
The Moment the Alert Lands
The single most important thing to understand about a honeypot alert is what it is telling you and what it is not. It is telling you that something on your network has interacted with a decoy that nothing legitimate should ever touch. It is not telling you that your backups are compromised, that ransomware has deployed, or that anything has been encrypted.
This distinction matters because the wrong response to an alert is to panic and immediately shut everything down. Killing systems without thought destroys forensic evidence, may interrupt legitimate backups mid-job, and can make recovery harder than the attack itself would have been. It is a pattern documented across multiple incident post-mortems: organisations that killed everything the moment they detected a problem wiped the forensic trail, made recovery harder, and in some cases still ended up paying because their backups had already been touched before the visible attack triggered.
A honeypot alert means you have time. The attack is in its reconnaissance phase. Treat it like a fire alarm that went off in a building that is not yet burning - the right response is methodical, not frantic.
Killing systems without a plan destroys log evidence, breaks backup chains, and can trigger encryption payloads that are waiting on a tripwire. Isolate, do not obliterate. Everything below is ordered for a reason.
First 5 Minutes: Confirm and Classify
Before you do anything operationally, you need two pieces of information: whether the alert is real, and where the source IP sits in your environment. These take two minutes and determine everything that follows.
Open the Ootbi Cluster Manager and find the alert. Record the source IP address, the Event ID, the protocol targeted, and the timestamp. You will need all of this. If you have Syslog configured, pull the raw event there too - it will have more detail and the copy is safer than relying on the dashboard alone.
Look up the source IP against your asset inventory and check your DHCP leases. There are three possibilities, and each leads to a different response path:
Known internal machine, authorised role - this is most likely a misconfigured monitoring agent, a vulnerability scanner that was pointed at the wrong subnet, or a network discovery tool someone ran without checking the scope. Verify directly with whoever owns that machine before escalating. This is the false positive case - confirm it is innocent before closing the alert.
Known internal machine, no legitimate reason to be scanning - this is a compromised internal endpoint. Someone or something has your network and is using it to look for Veeam infrastructure. This is a real incident. Escalate immediately and proceed with containment below.
Unknown IP or external source - an attacker already has a foothold in your environment. This is also a real incident. Proceed with containment.
If you have a security team or an MSP handling your security, call them before taking any containment action on a machine you do not own. They may already know about the activity - a penetration test, a vulnerability scan, or a new monitoring tool. A two-minute call before you isolate a machine is faster than explaining to a security analyst why you took their scanning tool offline.
First 30 Minutes: Contain and Protect the Backup Stack
If you have classified this as a real incident, the priority for the next 30 minutes is simple: make sure the attacker cannot reach your real backup infrastructure before you understand what you are dealing with. This is not full remediation. This is protecting your recovery options while the investigation begins.
If the source is a known machine, isolate it by pulling its network access at the switch or firewall level - not by shutting it down. Pulling the network keeps the machine running for forensic work while stopping lateral movement. Shutting it down may destroy volatile memory evidence and, depending on the malware, could trigger an encryption event that was waiting on shutdown.
If the source IP is not resolvable to a known machine, block it at the firewall and flag the investigation to whoever handles your security. Do not attempt to trace an unknown IP yourself while also managing containment.
Check your firewall rules and confirm that the compromised or suspicious machine cannot reach your VBR server on the Veeam service ports. The critical ones are TCP 9392 (VBR console and Backup Service), TCP 9401 (secure mount server connections), and TCP 2500-3300 (data mover - dynamically assigned, one port per concurrent task). If you have followed the Veeam security best practice guide and put your VBR server in a dedicated restricted VLAN, this is already handled. If you have not, tightening this firewall rule right now - even temporarily - is the correct action.
Open the VBR console and check the job status dashboard. Look for jobs that failed unexpectedly, jobs that were interrupted, or any error messages that relate to repository access. A healthy backup dashboard at this point is a good sign. Errors involving repository connectivity or unexpected job failures warrant immediate investigation - they may indicate the attacker has already interacted with the backup infrastructure.
If you are running an Ootbi appliance or a Hardened Linux Repository, log into the management interface directly and confirm the current immutability status. On Ootbi, check the Cluster Manager dashboard for any unexpected access events or configuration changes. On a Hardened Linux Repository, verify no recent changes were made to the immutability settings. An intact, immutable backup copy is your fallback if this incident escalates.
At your perimeter firewall or internal VLAN rules, block SMB (TCP 445) and RDP (TCP 3389) from the compromised machine to the rest of the environment. These are the two most common protocols used for lateral movement after an initial foothold. This does not replace isolating the machine, but it limits the blast radius while you work.
Your Role vs the Security Team's Role
One of the biggest sources of confusion during a security incident is who is supposed to be doing what. As a backup admin, you own the backup infrastructure and the recovery capability. You do not own the investigation, the forensics, or the broader network response. Being clear about this boundary makes both sides faster.
🔒 Your Responsibility
- Protect and verify the backup stack
- Confirm immutable copies are intact
- Run Scan Backup to find the last clean restore point
- Ensure backups are not being actively targeted
- Be ready to restore when asked
- Document every action you take with a timestamp
🔍 Security Team's Responsibility
- Investigate the source and entry point
- Forensic analysis of the compromised machine
- Determine scope of the incident
- Lead the containment and eradication
- Handle law enforcement contact if required
- Own the broader network response
If you do not have a dedicated security team, the same division applies - you just have to wear both hats. In that case, finish your backup stack tasks first before moving to the investigation. Recovery capability is the priority. You cannot investigate your way back from encrypted backups.
Context-switching between forensic investigation and backup verification during a live incident is a reliable way to do both badly. Finish the backup verification steps below before you start digging into the source machine or pulling logs from your SIEM. Your backups are time-sensitive. The forensic evidence on the compromised machine is not going anywhere if it is isolated.
Verify Your Backups Before You Do Anything Else
This is the backup admin's most important job during an incident. Before any restoration decision gets made, you need to know two things: whether your backups are intact, and what the last clean restore point is. Everything else in the recovery phase depends on this.
In the VBR console, go to Backup Infrastructure and check the repository status. A repository showing as unavailable or reporting access errors is a red flag. Run a rescan to confirm the current state. If you are using Ootbi or a Hardened Repository, log into the management interface and check for any access events or unexpected changes in the audit log.
Go to Home in VBR and review the recent job session results. Write down the timestamp of the most recent successful backup for every critical workload. This is your starting point when you run the malware scan. You need to know what the freshest clean copy might be before you start looking for it.
In the VBR console, go to Home and look at the Last 24 Hours section. If Veeam's inline scan or guest indexing has flagged any backups as potentially infected, they will appear here. Also check under History for any malware detection events across a longer window. If the attacker has been in your environment for some time, infections may have already been written into backup chains without triggering encryption yet.
Using Veeam's Built-In Tools to Find a Clean Restore Point
Veeam v13 has three tools that are directly relevant during an incident response. Most admins know SureBackup. Fewer know that Scan Backup exists specifically for the "find the last clean restore point" problem. Secure Restore is the protection layer you use when you actually do the restoration.
Scan Backup: Finding the Last Clean Point
Scan Backup is the right tool when you need to identify exactly where in a backup chain the infection starts. It scans restore points using Veeam Threat Hunter (a signature-based engine), third-party antivirus software, or YARA rules - and it can scan backwards through a backup chain to find the most recent clean point, even if you do not know when the compromise occurred.
In the VBR console, go to the Home view. In the inventory pane, right-click the backup you want to scan and select Scan Backup. Select which scanning engine to use (Veeam Threat Hunter, AV, or YARA), choose the restore points to scan, and run the job. VBR will mark any restore point where malware is detected as Infected and identify the last clean point in the chain.
This gives you the information you need to make a recovery decision without having to restore into production first to check.
SureBackup: Verifying Recoverability
Once you have identified a candidate restore point, SureBackup lets you verify that it is actually recoverable before committing to a production restore. It boots the machine in an isolated virtual lab environment, runs integrity checks, and - if configured - performs a malware scan against the live image. Use the Backup verification and content scan only mode if you do not need full recoverability testing - it does not require a virtual lab to be set up and runs considerably faster.
Secure Restore: The Safety Net on the Way Back
When you do restore, use Secure Restore. It scans the backup data for malware using Veeam Threat Hunter, third-party AV, or YARA rules before writing it back to the production environment. If malware is detected, VBR will either abort the restore or restore to a quarantined network, depending on how you configure the action. This prevents reinfecting production from a backup that looked clean but was not.
When a SureBackup job or Scan Backup detects malware in a restore point, VBR marks that restore point and all subsequent ones in the chain as Infected. Those points are still accessible - you can inspect them and manage their status under Home in the Malware Detection section - but they will not be offered as clean restore options during a standard recovery wizard. This is intentional behaviour. Do not try to work around it by changing the status manually unless you have confirmed the detection was a false positive.
Who Needs to Know and When
Communication during an incident has two separate threads: internal escalation and, if personal data has been affected, regulatory notification. These are not optional and they have deadlines.
Internal Escalation
Immediately
Your manager and whoever owns security in your organisation. Do not wait to fully understand the incident before escalating - send what you know with a clear statement that you are investigating. More detail follows; getting the right people aware follows nothing.
Within the first hour
If you have cyber insurance, notify them. Most policies require notification within 24 hours of discovery. Late notification can affect coverage. You do not need to know the full scope - a brief "we have detected suspicious activity and are investigating" is enough to start the clock correctly.
As soon as scope is understood
Brief leadership on the situation, current containment status, and estimated recovery timeline if restoration is required. Keep it factual. Do not speculate on cause or attribution - say what you know, what you do not know, and what you are doing about it.
Regulatory Notification
If personal data has been accessed or compromised as part of this incident, GDPR (Article 33) requires notification to your supervisory authority within 72 hours of becoming aware of the breach. This clock starts from the moment you become aware a breach has occurred - not when you finish investigating it. You can submit an initial notification with incomplete details and provide further information as your investigation progresses.
Under GDPR Article 33, the notification window starts from the moment you have awareness of a breach - not when you complete your investigation. If you have determined that personal data was accessed or exposed, notify your supervisory authority now with the information you have. You can and should update the notification as more information becomes available. Waiting until the investigation is complete and missing the window is a compliance failure on top of a security incident.
Use phone or a secure chat channel that has not been touched by the compromised machine. If an attacker has a foothold in your environment and you are discussing your response over email, they can read your playbook. This is not paranoia - it is a common and well-documented attacker behaviour during active incidents.
After the Incident: What to Document
Documentation has three purposes: it protects you personally, it supports any insurance claim or regulatory submission, and it makes the next incident faster to handle. Start the log the moment the alert lands - not after the incident is closed.
- [ ] Timestamp of the honeypot alert and what the alert contained (Event ID, source IP, protocol)
- [ ] Timestamp and result of your classification decision (false positive / confirmed incident)
- [ ] Every containment action taken, with timestamps and the name of who took it
- [ ] Backup status at time of detection - last successful jobs, any errors or anomalies
- [ ] Results of Scan Backup - which restore points were clean, which were infected
- [ ] Whether a restoration was required and from what restore point
- [ ] Whether personal data was involved, and the timestamp of regulatory notification if applicable
- [ ] Root cause - how did the attacker gain initial access? This needs to be in writing.
- [ ] What you would do differently - this is the most valuable part of the document
When the incident is resolved, run a brief retrospective. What did the honeypot catch that nothing else would have? How long between the alert and containment? Were your backup timestamps recent enough that a clean restore point was available without losing significant data? The answers tell you where to invest next.
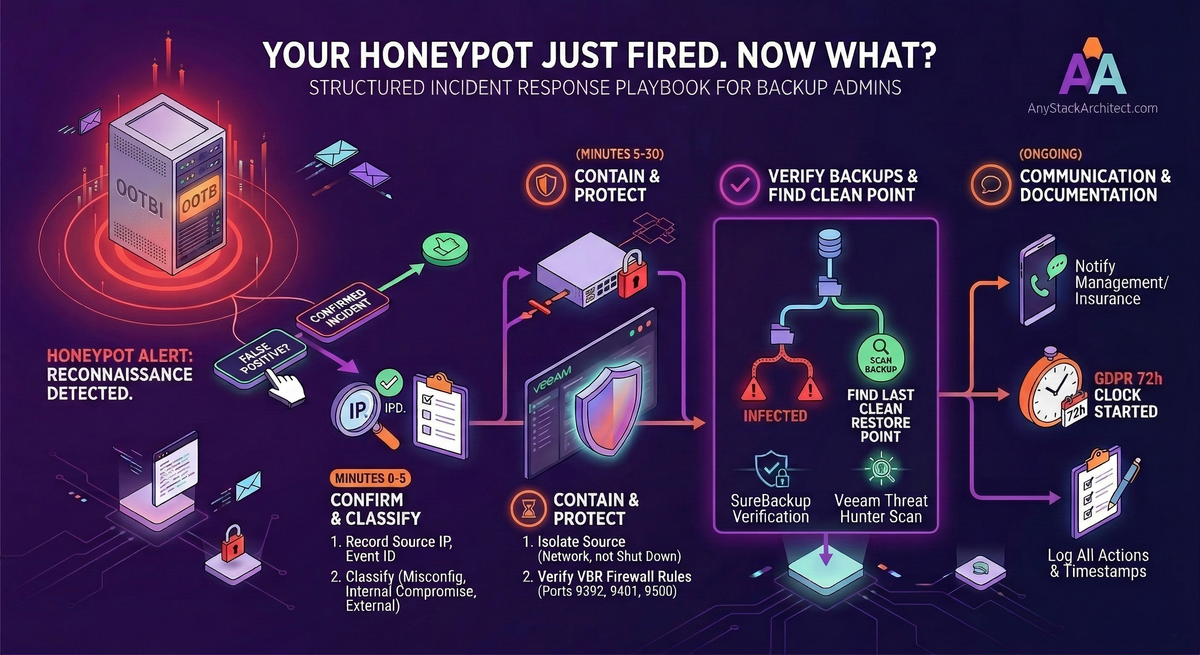
The Playbook at a Glance
- Do not panic and do not shut down immediately - isolate, do not obliterate
- Classify the source in the first five minutes - false positive, compromised internal machine, or external foothold
- Protect the backup stack first - verify VBR network isolation, check job status, confirm immutable copy is intact
- Use Scan Backup to find the last clean restore point - before any recovery decision is made
- Use Secure Restore when you restore - scan before writing back to production
- Escalate immediately, notify insurance within the hour - do not wait for the full picture
- GDPR 72-hour clock starts on awareness - not on investigation completion
- Log everything with timestamps from the first moment - your documentation is your defence
A honeypot alert is not a disaster. It is a warning with time attached to it. The organisations that survive ransomware well are not the ones that never get probed - they are the ones that know what to do when they find out they are being probed. This playbook is the difference between that and finding out the hard way.
